Supybot is an IRC bot, an application which can connect to a specific IRC channel and do stuff there. For example, with the
Bugzilla plugin, Supybot can report on the channel whenever a new bug is filed, or if somebody mentions "bug 1234" in the conversation, it will print details about bug 1234.
Install supybot
First, you have to install Supybot. If you are using Arch Linux,
get supybot from AUR, otherwise read the
INSTALL file.
Create a
supybot user on your system, or on a virtual machine where you want to run the bot.
groupadd --system supybot
useradd -m --system -g supybot supybot
Install the supybot Bugzilla plugin
If you want your bot to announce when new bugs are created, you need to set up an email account, register it on bugzilla and set it up so it gets mails when bugs for your project are created. For this go to Bugzilla -> Preferences -> Email Preferences and read the User Watching section!
Once you have the email account receiving emails from bugzilla,
setup getmail on your machine so it downloads the messages from the email account to /var/mail/supybot.
touch /var/mail/supybot
chown supybot.supybot /var/mail/supybot
chmod g+w /var/mail/supybot
chmod o-rwx /var/mail/supybot
chown supybot.supybot /var/mail/supybot
Set the getmail job to download the messages using POP and to delete them from the server after retrieving them.
[destination]
type = Mboxrd
path = /var/mail/supybot
[options]
verbose = 2
message_log = ~/.getmail/gmail.log
Now add yourself to the supybot group (so your getmail cronjob can write the bugzilla emails to /var/mail/supybot). For this to take effect the best option is to re-login!
usermod -a -G supybot YOUR_USERNAME
Add a crontab to your account (not supybot) to fetch the bugzilla mail every minute.
* * * * * getmail -d -q -r /path/to/your/getmail/config/file
Setup your bot
Next you have to create a config, and here it gets even more tricky. Unfortunately, most of the Supybot documentation is
gone because the supybot.com website is dead and only redirects to the sourceforge page of the project, where Supybot can be
downloaded. You have to create a config using
supybot-wizard:
mkdir /home/supybot/pitivi
cd /home/supybot/pitivi
# I suggest to act as an "advanced user" when the wizard asks you
# about what kind of user you are!
supybot-wizard
[...]
# Now see the conf file it created, feel free to rename it to bot.conf. ;)
ls -l *.conf
Copy the
Supybot Bugzilla plugin to your setup. Unfortunately the original repository is broken, but you can get it from my
Supybot Bugzilla repository.
cd /home/supybot/pitivi
mkdir plugins
cd plugins
bzr co bzr://bzr.everythingsolved.com/supybot/Bugzilla # Broken
git clone https://github.com/aleb/supybot-bugzilla.git Bugzilla
Copy the bugzilla section from this
sample config file to your
bot.conf file. Or copy it from the pitivibot's
bot.conf file below.
###
# Determines the bot's default nick.
#
# Default value: supybot
###
supybot.nick: pitivibot

###
# Determines what alternative nicks will be used if the primary nick
# (supybot.nick) isn't available. A %s in this nick is replaced by the
# value of supybot.nick when used. If no alternates are given, or if all
# are used, the supybot.nick will be perturbed appropriately until an
# unused nick is found.
#
# Default value: %s` %s_
###
supybot.nick.alternates: %s` %s_

###
# Determines the bot's ident string, if the server doesn't provide one
# by default.
#
# Default value: supybot
###
supybot.ident: supybot

###
# Determines the user the bot sends to the server. A standard user using
# the current version of the bot will be generated if this is left
# empty.
#
# Default value:
###
supybot.user: pitivibot

###
# Determines what networks the bot will connect to.
#
# Default value:
###
supybot.networks: freenode

###
# Determines what password will be used on freenode. Yes, we know that
# technically passwords are server-specific and not network-specific,
# but this is the best we can do right now.
#
# Default value:
###
supybot.networks.freenode.password:

###
# Determines what servers the bot will connect to for freenode. Each
# will be tried in order, wrapping back to the first when the cycle is
# completed.
#
# Default value:
###
supybot.networks.freenode.servers: chat.eu.freenode.net

###
# Determines what channels the bot will join only on freenode.
#
# Default value:
###
supybot.networks.freenode.channels: #pitivi

###
# Determines what key (if any) will be used to join the channel.
#
# Default value:
###
supybot.networks.freenode.channels.key:

###
# Determines whether the bot will attempt to connect with SSL sockets to
# freenode.
#
# Default value: False
###
supybot.networks.freenode.ssl: False

###
# Determines how timestamps printed for human reading should be
# formatted. Refer to the Python documentation for the time module to
# see valid formatting characters for time formats.
#
# Default value: %I:%M %p, %B %d, %Y
###
supybot.reply.format.time: %H:%M %Y-%m-%d %Z

###
# Determines whether elapsed times will be given as "1 day, 2 hours, 3
# minutes, and 15 seconds" or as "1d 2h 3m 15s".
#
# Default value: False
###
supybot.reply.format.time.elapsed.short: True

###
# Determines the absolute maximum length of the bot's reply -- no reply
# will be passed through the bot with a length greater than this.
#
# Default value: 131072
###
supybot.reply.maximumLength: 131072

###
# Determines whether the bot will break up long messages into chunks and
# allow users to use the 'more' command to get the remaining chunks.
#
# Default value: True
###
supybot.reply.mores: True

###
# Determines what the maximum number of chunks (for use with the 'more'
# command) will be.
#
# Default value: 50
###
supybot.reply.mores.maximum: 50

###
# Determines how long individual chunks will be. If set to 0, uses our
# super-tweaked, get-the-most-out-of-an-individual-message default.
#
# Default value: 0
###
supybot.reply.mores.length: 0

###
# Determines how many mores will be sent instantly (i.e., without the
# use of the more command, immediately when they are formed). Defaults
# to 1, which means that a more command will be required for all but the
# first chunk.
#
# Default value: 1
###
supybot.reply.mores.instant: 1

###
# Determines whether the bot will send multi-message replies in a single
# message or in multiple messages. For safety purposes (so the bot is
# less likely to flood) it will normally send everything in a single
# message, using mores if necessary.
#
# Default value: True
###
supybot.reply.oneToOne: True

###
# Determines whether the bot will reply with an error message when it is
# addressed but not given a valid command. If this value is False, the
# bot will remain silent, as long as no other plugins override the
# normal behavior.
#
# Default value: True
###
supybot.reply.whenNotCommand: False

###
# Determines whether error messages that result from bugs in the bot
# will show a detailed error message (the uncaught exception) or a
# generic error message.
#
# Default value: False
###
supybot.reply.error.detailed: False

###
# Determines whether the bot will send error messages to users in
# private. You might want to do this in order to keep channel traffic to
# minimum. This can be used in combination with
# supybot.reply.error.withNotice.
#
# Default value: False
###
supybot.reply.error.inPrivate: False

###
# Determines whether the bot will send error messages to users via
# NOTICE instead of PRIVMSG. You might want to do this so users can
# ignore NOTICEs from the bot and not have to see error messages; or you
# might want to use it in combination with supybot.reply.errorInPrivate
# so private errors don't open a query window in most IRC clients.
#
# Default value: False
###
supybot.reply.error.withNotice: False

###
# Determines whether the bot will send an error message to users who
# attempt to call a command for which they do not have the necessary
# capability. You may wish to make this True if you don't want users to
# understand the underlying security system preventing them from running
# certain commands.
#
# Default value: False
###
supybot.reply.error.noCapability: False

###
# Determines whether the bot will reply privately when replying in a
# channel, rather than replying to the whole channel.
#
# Default value: False
###
supybot.reply.inPrivate: False

###
# Determines whether the bot will reply with a notice when replying in a
# channel, rather than replying with a privmsg as normal.
#
# Default value: False
###
supybot.reply.withNotice: False

###
# Determines whether the bot will reply with a notice when it is sending
# a private message, in order not to open a /query window in clients.
# This can be overridden by individual users via the user configuration
# variable reply.withNoticeWhenPrivate.
#
# Default value: False
###
supybot.reply.withNoticeWhenPrivate: False

###
# Determines whether the bot will always prefix the user's nick to its
# reply to that user's command.
#
# Default value: True
###
supybot.reply.withNickPrefix: False

###
# Determines whether the bot should attempt to reply to all messages
# even if they don't address it (either via its nick or a prefix
# character). If you set this to True, you almost certainly want to set
# supybot.reply.whenNotCommand to False.
#
# Default value: False
###
supybot.reply.whenNotAddressed: False

###
# Determines whether the bot will allow you to send channel-related
# commands outside of that channel. Sometimes people find it confusing
# if a channel-related command (like Filter.outfilter) changes the
# behavior of the channel but was sent outside the channel itself.
#
# Default value: False
###
supybot.reply.requireChannelCommandsToBeSentInChannel: False

###
# Supybot normally replies with the full help whenever a user misuses a
# command. If this value is set to True, the bot will only reply with
# the syntax of the command (the first line of the help) rather than the
# full help.
#
# Default value: False
###
supybot.reply.showSimpleSyntax: False

###
# Determines what prefix characters the bot will reply to. A prefix
# character is a single character that the bot will use to determine
# what messages are addressed to it; when there are no prefix characters
# set, it just uses its nick. Each character in this string is
# interpreted individually; you can have multiple prefix chars
# simultaneously, and if any one of them is used as a prefix the bot
# will assume it is being addressed.
#
# Default value:
###
supybot.reply.whenAddressedBy.chars:

###
# Determines what strings the bot will reply to when they are at the
# beginning of the message. Whereas prefix.chars can only be one
# character (although there can be many of them), this variable is a
# space-separated list of strings, so you can set something like '@@ ??'
# and the bot will reply when a message is prefixed by either @@ or ??.
#
# Default value:
###
supybot.reply.whenAddressedBy.strings:

###
# Determines whether the bot will reply when people address it by its
# nick, rather than with a prefix character.
#
# Default value: True
###
supybot.reply.whenAddressedBy.nick: False

###
# Determines whether the bot will reply when people address it by its
# nick at the end of the message, rather than at the beginning.
#
# Default value: False
###
supybot.reply.whenAddressedBy.nick.atEnd: False

###
# Determines what extra nicks the bot will always respond to when
# addressed by, even if its current nick is something else.
#
# Default value:
###
supybot.reply.whenAddressedBy.nicks:

###
# Determines whether the bot will unidentify someone when that person
# changes his or her nick. Setting this to True will cause the bot to
# track such changes. It defaults to False for a little greater
# security.
#
# Default value: False
###
supybot.followIdentificationThroughNickChanges: False

###
# Determines whether the bot will always join a channel when it's
# invited. If this value is False, the bot will only join a channel if
# the user inviting it has the 'admin' capability (or if it's explicitly
# told to join the channel using the Admin.join command)
#
# Default value: False
###
supybot.alwaysJoinOnInvite: False

###
# Determines what message the bot replies with when a command succeeded.
# If this configuration variable is empty, no success message will be
# sent.
###
supybot.replies.success: The operation succeeded.

###
# Determines what error message the bot gives when it wants to be
# ambiguous.
###
supybot.replies.error: An error has occurred and has been logged. Please\
                       contact this bot's administrator for more\
                       information.

###
# Determines what message the bot replies with when someone tries to use
# a command that requires being identified or having a password and
# neither credential is correct.
###
supybot.replies.incorrectAuthentication: Your hostmask doesn't match or your\
                                         password is wrong.

###
# Determines what error message the bot replies with when someone tries
# to accessing some information on a user the bot doesn't know about.
###
supybot.replies.noUser: I can't find %s in my user database. If you didn't\
                        give a user name, then I might not know what your\
                        user is, and you'll need to identify before this\
                        command might work.

###
# Determines what error message the bot replies with when someone tries
# to do something that requires them to be registered but they're not
# currently recognized.
###
supybot.replies.notRegistered: You must be registered to use this command.\
                               If you are already registered, you must\
                               either identify (using the identify command)\
                               or add a hostmask matching your current\
                               hostmask (using the "hostmask add" command).

###
# Determines what error message is given when the bot is telling someone
# they aren't cool enough to use the command they tried to use.
###
supybot.replies.noCapability: You don't have the %s capability. If you think\
                              that you should have this capability, be sure\
                              that you are identified before trying again.\
                              The 'whoami' command can tell you if you're\
                              identified.

###
# Determines what generic error message is given when the bot is telling
# someone that they aren't cool enough to use the command they tried to
# use, and the author of the code calling errorNoCapability didn't
# provide an explicit capability for whatever reason.
###
supybot.replies.genericNoCapability: You're missing some capability you\
                                     need. This could be because you\
                                     actually possess the anti-capability\
                                     for the capability that's required of\
                                     you, or because the channel provides\
                                     that anti-capability by default, or\
                                     because the global capabilities include\
                                     that anti-capability. Or, it could be\
                                     because the channel or\
                                     supybot.capabilities.default is set to\
                                     False, meaning that no commands are\
                                     allowed unless explicitly in your\
                                     capabilities. Either way, you can't do\
                                     what you want to do.

###
# Determines what error messages the bot sends to people who try to do
# things in a channel that really should be done in private.
###
supybot.replies.requiresPrivacy: That operation cannot be done in a channel.

###
# Determines what message the bot sends when it thinks you've
# encountered a bug that the developers don't know about.
###
supybot.replies.possibleBug: This may be a bug. If you think it is, please\
                             file a bug report at .

###
# A floating point number of seconds to throttle snarfed URLs, in order
# to prevent loops between two bots snarfing the same URLs and having
# the snarfed URL in the output of the snarf message.
#
# Default value: 10.0
###
supybot.snarfThrottle: 10.0

###
# Determines the number of seconds between running the upkeep function
# that flushes (commits) open databases, collects garbage, and records
# some useful statistics at the debugging level.
#
# Default value: 3600
###
supybot.upkeepInterval: 3600

###
# Determines whether the bot will periodically flush data and
# configuration files to disk. Generally, the only time you'll want to
# set this to False is when you want to modify those configuration files
# by hand and don't want the bot to flush its current version over your
# modifications. Do note that if you change this to False inside the
# bot, your changes won't be flushed. To make this change permanent, you
# must edit the registry yourself.
#
# Default value: True
###
supybot.flush: True

###
# Determines what characters are valid for quoting arguments to commands
# in order to prevent them from being tokenized.
#
# Default value: "
###
supybot.commands.quotes: "

###
# Determines whether the bot will allow nested commands, which rule. You
# definitely should keep this on.
#
# Default value: True
###
supybot.commands.nested: True

###
# Determines what the maximum number of nested commands will be; users
# will receive an error if they attempt commands more nested than this.
#
# Default value: 10
###
supybot.commands.nested.maximum: 10

###
# Supybot allows you to specify what brackets are used for your nested
# commands. Valid sets of brackets include [], <>, and {} (). [] has
# strong historical motivation, as well as being the brackets that don't
# require shift. <> or () might be slightly superior because they cannot
# occur in a nick. If this string is empty, nested commands will not be
# allowed in this channel.
#
# Default value: []
###
supybot.commands.nested.brackets: []

###
# Supybot allows nested commands. Enabling this option will allow nested
# commands with a syntax similar to UNIX pipes, for example: 'bot: foo |
# bar'.
#
# Default value: False
###
supybot.commands.nested.pipeSyntax: False

###
# Determines what commands have default plugins set, and which plugins
# are set to be the default for each of those commands.
###
supybot.commands.defaultPlugins.addcapability: Admin
supybot.commands.defaultPlugins.capabilities: User
supybot.commands.defaultPlugins.disable: Owner
supybot.commands.defaultPlugins.enable: Owner
supybot.commands.defaultPlugins.help: Misc
supybot.commands.defaultPlugins.ignore: Admin

###
# Determines what plugins automatically get precedence over all other
# plugins when selecting a default plugin for a command. By default,
# this includes the standard loaded plugins. You probably shouldn't
# change this if you don't know what you're doing; if you do know what
# you're doing, then also know that this set is case-sensitive.
#
# Default value: Plugin Admin Misc User Owner Config Channel
###
supybot.commands.defaultPlugins.importantPlugins: Plugin Admin Misc User Owner Config Channel
supybot.commands.defaultPlugins.list: Misc
supybot.commands.defaultPlugins.reload: Owner
supybot.commands.defaultPlugins.removecapability: Admin
supybot.commands.defaultPlugins.unignore: Admin

###
# Determines what commands are currently disabled. Such commands will
# not appear in command lists, etc. They will appear not even to exist.
#
# Default value:
###
supybot.commands.disabled:

###
# Determines whether the bot will defend itself against command-
# flooding.
#
# Default value: True
###
supybot.abuse.flood.command: True

###
# Determines how many commands users are allowed per minute. If a user
# sends more than this many commands in any 60 second period, he or she
# will be ignored for supybot.abuse.flood.command.punishment seconds.
#
# Default value: 12
###
supybot.abuse.flood.command.maximum: 12

###
# Determines how many seconds the bot will ignore users who flood it
# with commands.
#
# Default value: 300
###
supybot.abuse.flood.command.punishment: 300

###
# Determines whether the bot will defend itself against invalid command-
# flooding.
#
# Default value: True
###
supybot.abuse.flood.command.invalid: True

###
# Determines how many invalid commands users are allowed per minute. If
# a user sends more than this many invalid commands in any 60 second
# period, he or she will be ignored for
# supybot.abuse.flood.command.invalid.punishment seconds. Typically,
# this value is lower than supybot.abuse.flood.command.maximum, since
# it's far less likely (and far more annoying) for users to flood with
# invalid commands than for them to flood with valid commands.
#
# Default value: 5
###
supybot.abuse.flood.command.invalid.maximum: 5

###
# Determines how many seconds the bot will ignore users who flood it
# with invalid commands. Typically, this value is higher than
# supybot.abuse.flood.command.punishment, since it's far less likely
# (and far more annoying) for users to flood witih invalid commands than
# for them to flood with valid commands.
#
# Default value: 600
###
supybot.abuse.flood.command.invalid.punishment: 600

###
# Determines the default length of time a driver should block waiting
# for input.
#
# Default value: 1.0
###
supybot.drivers.poll: 1.0

###
# Determines what driver module the bot will use. Socket, a simple
# driver based on timeout sockets, is used by default because it's
# simple and stable. Twisted is very stable and simple, and if you've
# got Twisted installed, is probably your best bet.
#
# Default value: default
###
supybot.drivers.module: default

###
# Determines the maximum time the bot will wait before attempting to
# reconnect to an IRC server. The bot may, of course, reconnect earlier
# if possible.
#
# Default value: 300.0
###
supybot.drivers.maxReconnectWait: 300.0

###
# Determines what directory configuration data is put into.
#
# Default value: conf
###
supybot.directories.conf: /home/supybot/pitivi/conf

###
# Determines what directory data is put into.
#
# Default value: data
###
supybot.directories.data: /home/supybot/pitivi/data

###
# Determines what directory temporary files are put into.
#
# Default value: tmp
###
supybot.directories.data.tmp: /home/supybot/pitivi/data/tmp

###
# Determines what directory backup data is put into.
#
# Default value: backup
###
supybot.directories.backup: /home/supybot/pitivi/backup

###
# Determines what directories the bot will look for plugins in. Accepts
# a comma-separated list of strings. This means that to add another
# directory, you can nest the former value and add a new one. E.g. you
# can say: bot: 'config supybot.directories.plugins [config
# supybot.directories.plugins], newPluginDirectory'.
#
# Default value:
###
supybot.directories.plugins: /home/supybot/pitivi/plugins

###
# Determines what directory the bot will store its logfiles in.
#
# Default value: logs
###
supybot.directories.log: /home/supybot/pitivi/logs

###
# Determines what plugins will be loaded.
#
# Default value:
###
supybot.plugins: Web Admin Misc Bugzilla User Owner Config Channel

###
# Determines whether this plugin is loaded by default.
###
supybot.plugins.Admin: True

###
# Determines whether this plugin is publicly visible.
#
# Default value: True
###
supybot.plugins.Admin.public: True

###
# Determines whether this plugin is loaded by default.
###
supybot.plugins.Bugzilla: True

###
# Determines whether this plugin is publicly visible.
#
# Default value: True
###
supybot.plugins.Bugzilla.public: True

###
# Determines whether the bug snarfer will be enabled, such that any
# Bugzilla URLs and bug ### seen in the channel will have their
# information reported into the channel.
#
# Default value: False
###
supybot.plugins.Bugzilla.bugSnarfer: True

###
# Users often say "bug XXX" several times in a row, in a channel. If
# "bug XXX" has been said in the last (this many) seconds, don't fetch
# its data again. If you change the value of this variable, you must
# reload this plugin for the change to take effect.
#
# Default value: 300
###
supybot.plugins.Bugzilla.bugSnarferTimeout: 300

###
# The fields to list when describing a bug, after the URL.
#
# Default value: bug_severity priority target_milestone assigned_to bug_status short_desc
###
supybot.plugins.Bugzilla.bugFormat: bug_severity priority target_milestone assigned_to bug_status short_desc

###
# The fields to list when describing an attachment after announcing a
# change to that attachment.
#
# Default value: type desc filename
###
supybot.plugins.Bugzilla.attachFormat: type desc filename

###
# How various messages should be formatted in terms of bold, colors,
# etc.
###

###
# When the plugin reports that something has changed on a bug, how
# should that string be formatted?
#
# Default value: teal
###
supybot.plugins.Bugzilla.format.change: teal

###
# When the plugin reports the details of an attachment, how should we
# format that string?
#
# Default value: green
###
supybot.plugins.Bugzilla.format.attachment: green

###
# When the plugin reports the details of a bug, how should we format
# that string?
#
# Default value: red
###
supybot.plugins.Bugzilla.format.bug: red

###
# The number of results to show when using the "query" command.
#
# Default value: 5
###
supybot.plugins.Bugzilla.queryResultLimit: 5

###
# A path to the mbox that we should be watching for bugmail.
#
# Default value:
###
supybot.plugins.Bugzilla.mbox: /var/mail/supybot

###
# How many seconds should we wait between polling the mbox?
#
# Default value: 10
###
supybot.plugins.Bugzilla.mboxPollTimeout: 10

###
# Various messages that can be re-formatted as you wish. If a message
# takes a format string, the available format variables are: product,
# component, bug_id, attach_id, and changer)
###

###
# What the bot will say when somebody adds a new attachment to a bug.
#
# Default value: %(changer)s added attachment %(attach_id)d to bug %(bug_id)d
###
supybot.plugins.Bugzilla.messages.newAttachment: %(changer)s added attachment %(attach_id)d to bug %(bug_id)d

###
# What the bot will say when a new bug is filed.
#
# Default value: New %(product)s bug %(bug_id)d filed by %(changer)s.
###
supybot.plugins.Bugzilla.messages.newBug: New %(product)s bug %(bug_id)d filed by %(changer)s.

###
# How should we describe it when somebody requests a flag without
# specifying a requestee? This should probably start with "from." It can
# also be entirely empty, if you want.
#
# Default value: from the wind
###
supybot.plugins.Bugzilla.messages.noRequestee: from the wind

###
# The various Bugzilla installations that have been created with the
# 'add' command.
#
# Default value:
###
supybot.plugins.Bugzilla.bugzillas: gnome

###
# Determines the URL to this Bugzilla installation. This must be
# identical to the urlbase (or sslbase) parameter used by the
# installation. (The url that shows up in emails.) It must end with a
# forward slash.
#
# Default value:
###
supybot.plugins.Bugzilla.bugzillas.gnome.url: https://bugzilla.gnome.org/

###
# Additional search terms in QuickSearch format, that will be added to
# every search done with "query" against this installation.
#
# Default value:
###
supybot.plugins.Bugzilla.bugzillas.gnome.queryTerms:

###
# Should *all* changes be reported to this channel?
#
# Default value: False
###
supybot.plugins.Bugzilla.bugzillas.gnome.watchedItems.all: False

###
# Whose changes should be reported to this channel?
#
# Default value:
###
supybot.plugins.Bugzilla.bugzillas.gnome.watchedItems.changer:

###
# What components should be reported to this channel?
#
# Default value:
###
supybot.plugins.Bugzilla.bugzillas.gnome.watchedItems.component:

###
# What products should be reported to this channel?
#
# Default value:
###
supybot.plugins.Bugzilla.bugzillas.gnome.watchedItems.product: pitivi

###
# The names of fields, as they appear in bugmail, that should be
# reported to this channel.
#
# Default value: newBug, newAttach, Flags, Attachment Flags, Resolution, Product, Component
###
supybot.plugins.Bugzilla.bugzillas.gnome.reportedChanges: newBug

###
# Some Bugzilla installations have gdb stack traces in comments. If you
# turn this on, the bot will report some basic details of any trace that
# shows up in the comments of a new bug.
#
# Default value: False
###
supybot.plugins.Bugzilla.bugzillas.gnome.traces.report: False

###
# Some functions are useless to report, from a stack trace. This
# contains a list of function names to skip over when reporting traces
# to the channel.
#
# Default value: __kernel_vsyscall raise abort ??
###
supybot.plugins.Bugzilla.bugzillas.gnome.traces.ignoreFunctions: __kernel_vsyscall raise abort ??

###
# How many stack frames should be reported from the crash?
#
# Default value: 5
###
supybot.plugins.Bugzilla.bugzillas.gnome.traces.frameLimit: 5

###
# If commands don't specify what installation to use, then which
# installation should we use?
#
# Default value:
###
supybot.plugins.Bugzilla.defaultBugzilla: gnome

###
# Determines whether this plugin is loaded by default.
###
supybot.plugins.Channel: True

###
# Determines whether this plugin is publicly visible.
#
# Default value: True
###
supybot.plugins.Channel.public: True

###
# Determines whether the bot will always try to rejoin a channel
# whenever it's kicked from the channel.
#
# Default value: True
###
supybot.plugins.Channel.alwaysRejoin: True

###
# Determines whether this plugin is loaded by default.
###
supybot.plugins.Config: True

###
# Determines whether this plugin is publicly visible.
#
# Default value: True
###
supybot.plugins.Config.public: True

###
# Determines whether this plugin is loaded by default.
###
supybot.plugins.Misc: True

###
# Determines whether this plugin is publicly visible.
#
# Default value: True
###
supybot.plugins.Misc.public: True

###
# Determines whether the bot will list private plugins with the list
# command if given the --private switch. If this is disabled, non-owner
# users should be unable to see what private plugins are loaded.
#
# Default value: True
###
supybot.plugins.Misc.listPrivatePlugins: False

###
# Determines the format string for timestamps in the Misc.last command.
# Refer to the Python documentation for the time module to see what
# formats are accepted. If you set this variable to the empty string,
# the timestamp will not be shown.
#
# Default value: [%H:%M:%S]
###
supybot.plugins.Misc.timestampFormat: [%H:%M:%S]

###
# Determines whether or not the timestamp will be included in the output
# of last when it is part of a nested command
#
# Default value: False
###
supybot.plugins.Misc.last.nested.includeTimestamp: False

###
# Determines whether or not the nick will be included in the output of
# last when it is part of a nested command
#
# Default value: False
###
supybot.plugins.Misc.last.nested.includeNick: False

###
# Determines whether this plugin is loaded by default.
###
supybot.plugins.Owner: True

###
# Determines whether this plugin is publicly visible.
#
# Default value: True
###
supybot.plugins.Owner.public: True

###
# Determines what quit message will be used by default. If the quit
# command is called without a quit message, this will be used. If this
# value is empty, the nick of the person giving the quit command will be
# used.
#
# Default value:
###
supybot.plugins.Owner.quitMsg:

###
# Determines whether this plugin is loaded by default.
###
supybot.plugins.User: True

###
# Determines whether this plugin is publicly visible.
#
# Default value: True
###
supybot.plugins.User.public: True

###
# Determines whether this plugin is loaded by default.
###
supybot.plugins.Web: False

###
# Determines whether this plugin is publicly visible.
#
# Default value: True
###
supybot.plugins.Web.public: True

###
# Determines whether the bot will output the HTML title of URLs it sees
# in the channel.
#
# Default value: False
###
supybot.plugins.Web.titleSnarfer: False

###
# Determines what URLs are to be snarfed and stored in the database in
# the channel; URLs matching the regexp given will not be snarfed. Give
# the empty string if you have no URLs that you'd like to exclude from
# being snarfed.
#
# Default value:
###
supybot.plugins.Web.nonSnarfingRegexp:

###
# Determines the maximum number of bytes the bot will download via the
# 'fetch' command in this plugin.
#
# Default value: 0
###
supybot.plugins.Web.fetch.maximum: 0

###
# Determines whether the bot will always load important plugins (Admin,
# Channel, Config, Misc, Owner, and User) regardless of what their
# configured state is. Generally, if these plugins are configured not to
# load, you didn't do it on purpose, and you still want them to load.
# Users who don't want to load these plugins are smart enough to change
# the value of this variable appropriately :)
#
# Default value: True
###
supybot.plugins.alwaysLoadImportant: True

###
# Determines what databases are available for use. If this value is not
# configured (that is, if its value is empty) then sane defaults will be
# provided.
#
# Default value: sqlite anydbm cdb flat pickle
###
supybot.databases:

###
# Determines what filename will be used for the users database. This
# file will go into the directory specified by the
# supybot.directories.conf variable.
#
# Default value: users.conf
###
supybot.databases.users.filename: users.conf

###
# Determines how long it takes identification to time out. If the value
# is less than or equal to zero, identification never times out.
#
# Default value: 0
###
supybot.databases.users.timeoutIdentification: 0

###
# Determines whether the bot will allow users to unregister their users.
# This can wreak havoc with already-existing databases, so by default we
# don't allow it. Enable this at your own risk. (Do also note that this
# does not prevent the owner of the bot from using the unregister
# command.)
#
# Default value: False
###
supybot.databases.users.allowUnregistration: False

###
# Determines what filename will be used for the ignores database. This
# file will go into the directory specified by the
# supybot.directories.conf variable.
#
# Default value: ignores.conf
###
supybot.databases.ignores.filename: ignores.conf

###
# Determines what filename will be used for the channels database. This
# file will go into the directory specified by the
# supybot.directories.conf variable.
#
# Default value: channels.conf
###
supybot.databases.channels.filename: channels.conf

###
# Determines whether database-based plugins that can be channel-specific
# will be so. This can be overridden by individual channels. Do note
# that the bot needs to be restarted immediately after changing this
# variable or your db plugins may not work for your channel; also note
# that you may wish to set
# supybot.databases.plugins.channelSpecific.link appropriately if you
# wish to share a certain channel's databases globally.
#
# Default value: True
###
supybot.databases.plugins.channelSpecific: False

###
# Determines what channel global (non-channel-specific) databases will
# be considered a part of. This is helpful if you've been running
# channel-specific for awhile and want to turn the databases for your
# primary channel into global databases. If
# supybot.databases.plugins.channelSpecific.link.allow prevents linking,
# the current channel will be used. Do note that the bot needs to be
# restarted immediately after changing this variable or your db plugins
# may not work for your channel.
#
# Default value: #
###
supybot.databases.plugins.channelSpecific.link: #

###
# Determines whether another channel's global (non-channel-specific)
# databases will be allowed to link to this channel's databases. Do note
# that the bot needs to be restarted immediately after changing this
# variable or your db plugins may not work for your channel.
#
# Default value: True
###
supybot.databases.plugins.channelSpecific.link.allow: True

###
# Determines whether CDB databases will be allowed as a database
# implementation.
#
# Default value: True
###
supybot.databases.types.cdb: True

###
# Determines how often CDB databases will have their modifications
# flushed to disk. When the number of modified records is greater than
# this part of the number of unmodified records, the database will be
# entirely flushed to disk.
#
# Default value: 0.5
###
supybot.databases.types.cdb.maximumModifications: 0.5

###
# Determines what will be used as the default banmask style.
#
# Default value: host user
###
supybot.protocols.irc.banmask: host user

###
# Determines whether the bot will strictly follow the RFC; currently
# this only affects what strings are considered to be nicks. If you're
# using a server or a network that requires you to message a nick such
# as services@this.network.server then you you should set this to False.
#
# Default value: False
###
supybot.protocols.irc.strictRfc: False

###
# Determines what user modes the bot will request from the server when
# it first connects. Many people might choose +i; some networks allow
# +x, which indicates to the auth services on those networks that you
# should be given a fake host.
#
# Default value:
###
supybot.protocols.irc.umodes:

###
# Determines what vhost the bot will bind to before connecting to the
# IRC server.
#
# Default value:
###
supybot.protocols.irc.vhost:

###
# Determines how many old messages the bot will keep around in its
# history. Changing this variable will not take effect until the bot is
# restarted.
#
# Default value: 1000
###
supybot.protocols.irc.maxHistoryLength: 1000

###
# A floating point number of seconds to throttle queued messages -- that
# is, messages will not be sent faster than once per throttleTime
# seconds.
#
# Default value: 1.0
###
supybot.protocols.irc.throttleTime: 1.0

###
# Determines whether the bot will send PINGs to the server it's
# connected to in order to keep the connection alive and discover
# earlier when it breaks. Really, this option only exists for debugging
# purposes: you always should make it True unless you're testing some
# strange server issues.
#
# Default value: True
###
supybot.protocols.irc.ping: True

###
# Determines the number of seconds between sending pings to the server,
# if pings are being sent to the server.
#
# Default value: 120
###
supybot.protocols.irc.ping.interval: 120

###
# Determines whether the bot will refuse duplicate messages to be queued
# for delivery to the server. This is a safety mechanism put in place to
# prevent plugins from sending the same message multiple times; most of
# the time it doesn't matter, unless you're doing certain kinds of
# plugin hacking.
#
# Default value: False
###
supybot.protocols.irc.queuing.duplicates: False

###
# Determines how many seconds must elapse between JOINs sent to the
# server.
#
# Default value: 0.0
###
supybot.protocols.irc.queuing.rateLimit.join: 0.0

###
# Determines how many bytes the bot will 'peek' at when looking through
# a URL for a doctype or title or something similar. It'll give up after
# it reads this many bytes, even if it hasn't found what it was looking
# for.
#
# Default value: 4096
###
supybot.protocols.http.peekSize: 4096

###
# Determines what proxy all HTTP requests should go through. The value
# should be of the form 'host:port'.
#
# Default value:
###
supybot.protocols.http.proxy:

###
# Determines whether the bot will ignore unregistered users by default.
# Of course, that'll make it particularly hard for those users to
# register or identify with the bot, but that's your problem to solve.
#
# Default value: False
###
supybot.defaultIgnore: False

###
# A string that is the external IP of the bot. If this is the empty
# string, the bot will attempt to find out its IP dynamically (though
# sometimes that doesn't work, hence this variable).
#
# Default value:
###
supybot.externalIP:

###
# Determines what the default timeout for socket objects will be. This
# means that *all* sockets will timeout when this many seconds has gone
# by (unless otherwise modified by the author of the code that uses the
# sockets).
#
# Default value: 10
###
supybot.defaultSocketTimeout: 10

###
# Determines what file the bot should write its PID (Process ID) to, so
# you can kill it more easily. If it's left unset (as is the default)
# then no PID file will be written. A restart is required for changes to
# this variable to take effect.
#
# Default value:
###
supybot.pidFile:

###
# Determines whether the bot will automatically thread all commands.
#
# Default value: False
###
supybot.debug.threadAllCommands: False

###
# Determines whether the bot will automatically flush all flushers
# *very* often. Useful for debugging when you don't know what's breaking
# or when, but think that it might be logged.
#
# Default value: False
###
supybot.debug.flushVeryOften: False

###
# Determines what the bot's logging format will be. The relevant
# documentation on the available formattings is Python's documentation
# on its logging module.
#
# Default value: %(levelname)s %(asctime)s %(name)s %(message)s
###
supybot.log.format: %(levelname)s %(asctime)s %(name)s %(message)s

###
# Determines what the minimum priority level logged to file will be. Do
# note that this value does not affect the level logged to stdout; for
# that, you should set the value of supybot.log.stdout.level. Valid
# values are DEBUG, INFO, WARNING, ERROR, and CRITICAL, in order of
# increasing priority.
#
# Default value: INFO
###
supybot.log.level: INFO

###
# Determines the format string for timestamps in logfiles. Refer to the
# Python documentation for the time module to see what formats are
# accepted. If you set this variable to the empty string, times will be
# logged in a simple seconds-since-epoch format.
#
# Default value: %Y-%m-%dT%H:%M:%S
###
supybot.log.timestampFormat: %Y-%m-%dT%H:%M:%S

###
# Determines whether the bot will log to stdout.
#
# Default value: True
###
supybot.log.stdout: True

###
# Determines whether the bot's logs to stdout (if enabled) will be
# colorized with ANSI color.
#
# Default value: False
###
supybot.log.stdout.colorized: True

###
# Determines whether the bot will wrap its logs when they're output to
# stdout.
#
# Default value: True
###
supybot.log.stdout.wrap: False

###
# Determines what the bot's logging format will be. The relevant
# documentation on the available formattings is Python's documentation
# on its logging module.
#
# Default value: %(levelname)s %(asctime)s %(message)s
###
supybot.log.stdout.format: %(levelname)s %(asctime)s %(message)s

###
# Determines what the minimum priority level logged will be. Valid
# values are DEBUG, INFO, WARNING, ERROR, and CRITICAL, in order of
# increasing priority.
#
# Default value: INFO
###
supybot.log.stdout.level: DEBUG

###
# Determines whether the bot will separate plugin logs into their own
# individual logfiles.
#
# Default value: False
###
supybot.log.plugins.individualLogfiles: False

###
# Determines what the bot's logging format will be. The relevant
# documentation on the available formattings is Python's documentation
# on its logging module.
#
# Default value: %(levelname)s %(asctime)s %(message)s
###
supybot.log.plugins.format: %(levelname)s %(asctime)s %(message)s

###
# These are the capabilities that are given to everyone by default. If
# they are normal capabilities, then the user will have to have the
# appropriate anti-capability if you want to override these
# capabilities; if they are anti-capabilities, then the user will have
# to have the actual capability to override these capabilities. See
# docs/CAPABILITIES if you don't understand why these default to what
# they do.
#
# Default value: -owner -admin -trusted
###
supybot.capabilities: -owner -admin -trusted

###
# Determines whether the bot by default will allow users to have a
# capability. If this is disabled, a user must explicitly have the
# capability for whatever command he wishes to run.
#
# Default value: True
###
supybot.capabilities.default: False
Make it dance
Now start your bot from the command line. This way you can see the debug log messages, in case you need to figure out why it does not work.
sudo -u supybot supybot /home/supybot/pitivi/bot.conf
Finally, create /lib/systemd/system/supybot.service to have it started automatically.
[Unit]
Description=Pitivi IRC bot
[Service]
User=supybot
ExecStart=/usr/bin/supybot /home/supybot/pitivi/bot.conf
UMask=0007
Restart=on-abort
StartLimitInterval=5m
StartLimitBurst=1
[Install]
WantedBy=multi-user.target
Remember to start it and enable it to start automatically.
systemctl start supybot
systemctl enable supybot
Alternatively, create a file in
/etc/init/ so Supybot is started automatically when the system starts. I probably copied the file below from somewhere, but I don't remember from where.
# This IRC bot serves #pitivi.
description "Pitivi IRC bot"
# I got this from mysql.conf, you might want to have a look
# at other files in /etc/init/ and copy a section which
# looks appropriate. Basically it should start the daemon
# after the network is started.
start on (net-device-up
and local-filesystems
and runlevel [2345])
stop on runlevel [016]
# Restart if it dies unexpectedly. Should not happen.
respawn
# Make sure the binary exists.
# It's recommended you install supybot from the current git
# HEAD, because no features are being worked on, and it
# should be stable: http://sf.net/projects/supybot/develop
# In this case, the binary is in /usr/local/bin/supybot.
# This may differ if you are using, the package included in
# your Linux distribution, for example.
pre-start script
test -x /usr/local/bin/supybot || { stop; exit 0; }
end script
# Output to the console whatever it outputs.
console output
# Run the bot with the specified config file.
#
# The bot does not need to run as a daemon, unless
# there are other jobs depending on its sucessful start,
# for example. If there are, you should add "expect fork",
# and specify --daemon to the command line, and hope that
# it works, because:
# "One needs to be very careful with the expect stanza
# to avoid confusing Upstart: the program must fork in
# precisely the expected way." ion
#
# To create the supybot system user and system group, and
# add yourself to the group so you can easily edit files
# run:
# addgroup --system supybot
# adduser --system --ingroup supybot supybot
exec sudo -u supybot /usr/local/bin/supybot /home/supybot/pitivi/bot.conf
Congratulations! Send me an email and tell me how happy you are that you have your bot. ;)


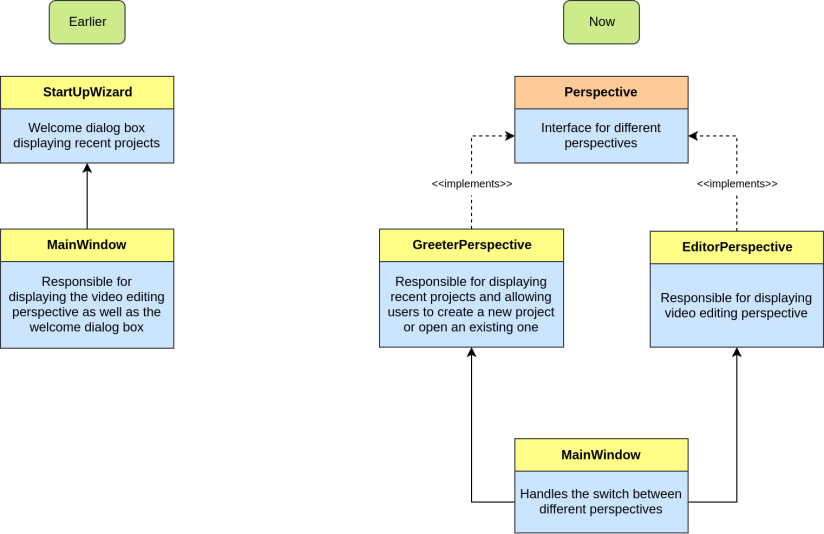

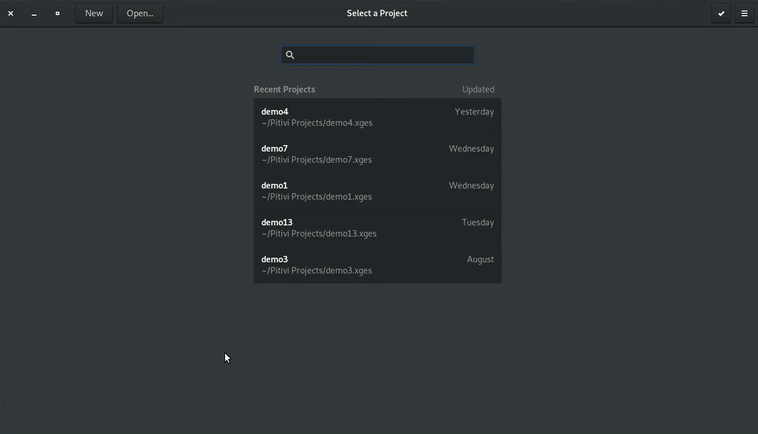 Search feature
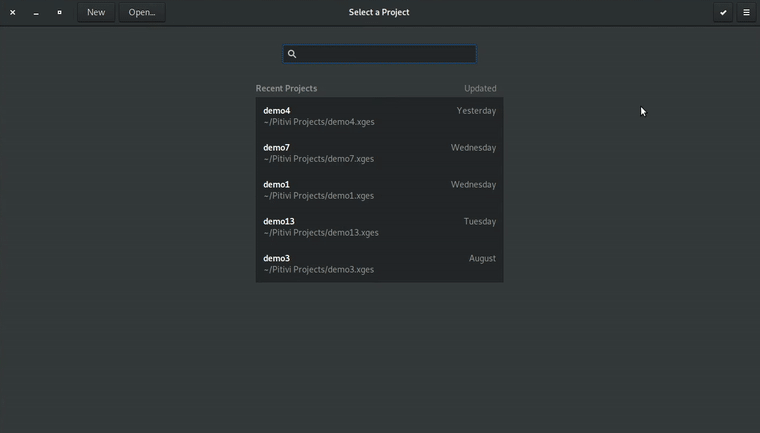 Selection feature
 Viewer resizing using corner marker
 Displaying resize status over dimmed video


 https://appr.tc running in WebKitGTK
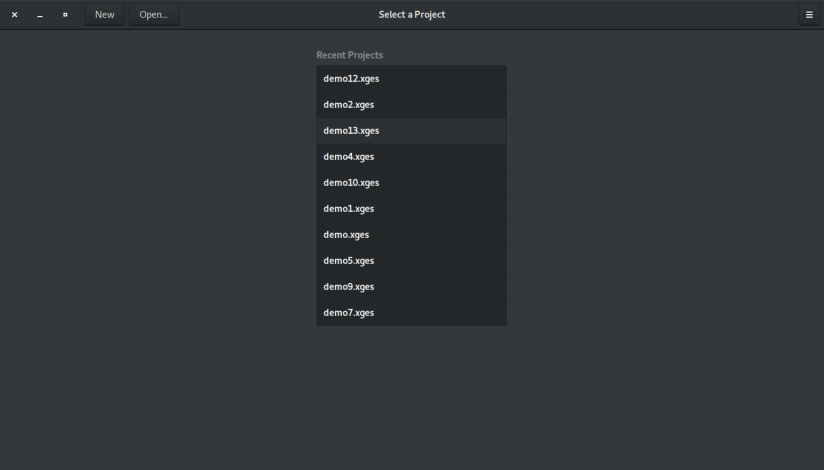
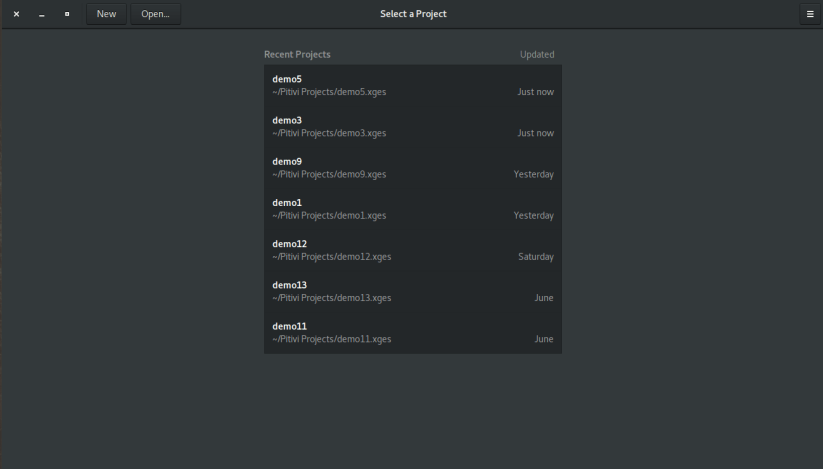
 Project thumbnails integrated in recent projects list
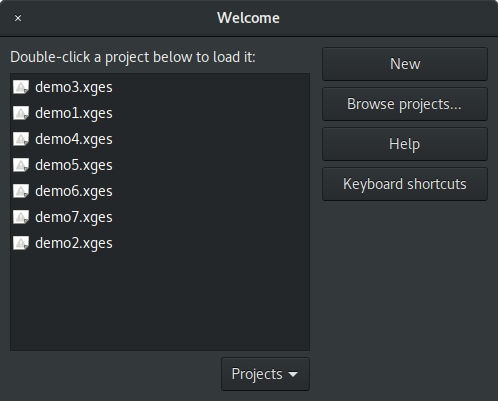


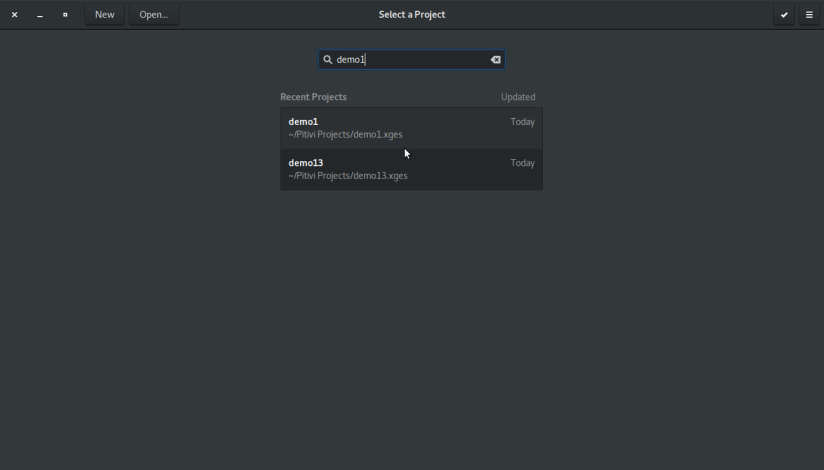 Recent projects found for search query “demo1”
 No recent project found for search query “demo12”
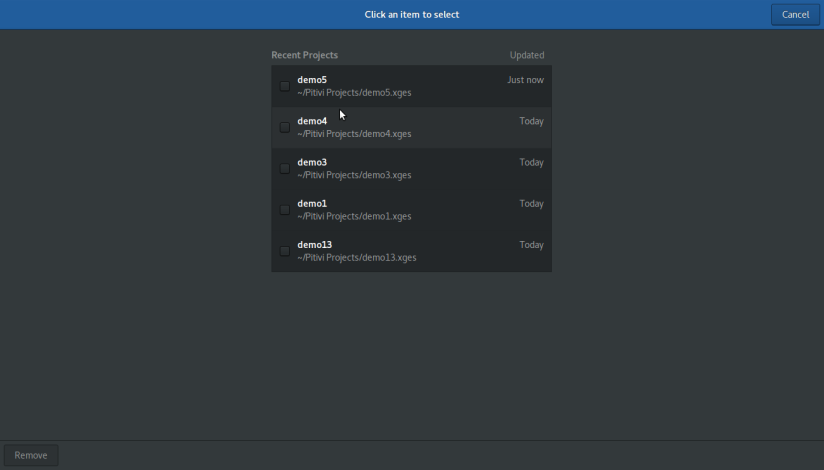 Remove project(s) screen
 Selected “demo4” project for removal
 “demo4” project removed from recent projects list
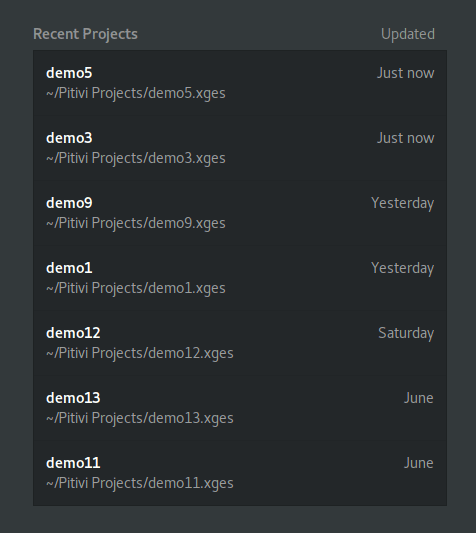 New layout of recent projects list
 Welcome window – Adwaita light theme
 “Close Project” button (highlighted in right)

 Initial design of custom project view
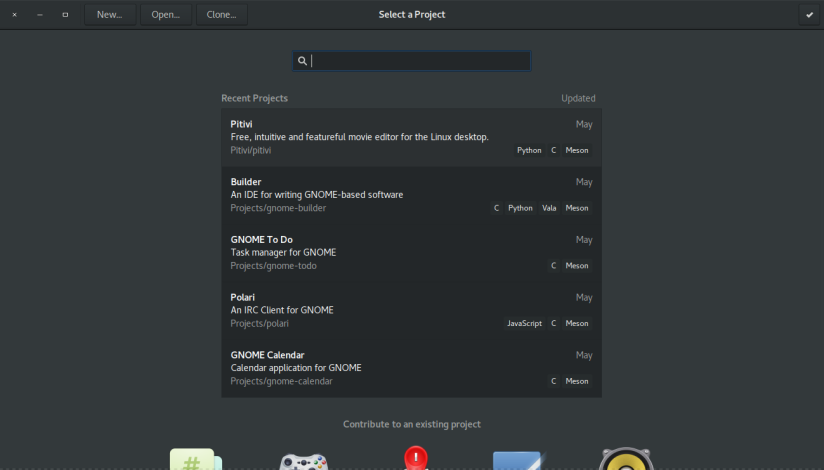 Integrated welcome window in GNOME Builder app
 Integrated welcome window in GNOME ToDo app
 Integrated welcome/greeter window in Pitivi. Notice that the important action buttons like “New” and “Open” are shown prominently in the header bar.
 Integrated welcome/greeter window in Pitivi. Notice that other (not so important) action buttons like “Keyboard Shortcuts”, “User Manual”, etc. are shown inside a menu in the header bar.
 The aspect ratio settings removed from the project settings dialog