Understanding layers
Layers are a fundamental concept for advanced editing in the timeline: compositing, mixing multiple videos simultaneously, and adding titles depend on this feature.
It is easier to think of layers in terms of images painted on glass. With several pieces of glass stacked on top of each other, each of these pieces of glass is a layer. If the top piece of glass is completely painted over, none of the pieces of glass underneath will be visible. If, on the other hand, you only paint over a portion of a piece of glass, you will be able to see what is underneath the non-painted parts.
Opacity (how solid “opaque” things are)
Each layer (and each clip) has its own transparency. To continue the paint on glass metaphor, if the paint is thin enough, it can be seen through. Visually, an opacity of 100% means you cannot see the clips below that layer or clip, and an opacity of 50% means you can partly see them.
How this translates in terms of user interface
While, in real life, you can stack pieces of glass onto each other in three dimensions, your computer monitor only has two dimensions. Thus, the layers on top (the “Z” axis in the physical world) are also visually on top, albeit on the “Y” axis.
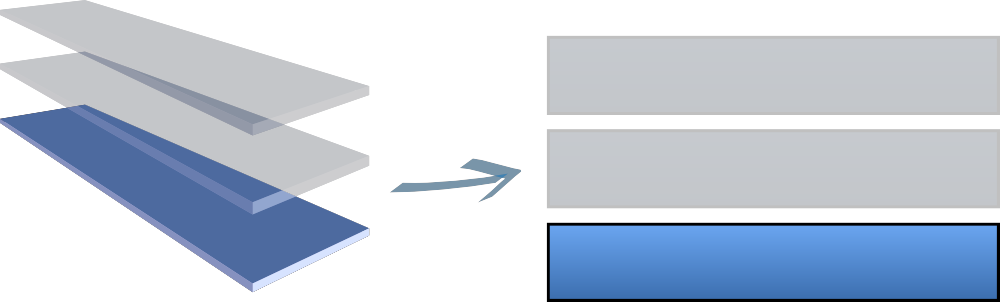
Clips located on a layer above will block the clips below from view, unless they have an opacity value lower than 100% (as shown with the two topmost layers in the previous illustration).
Renaming a layer
To rename a layer, click the layer's name, which is an editable text field.
Adjusting layer positioning
To move a layer to the top of the layer order, click Layer icon ▸ Move layer to top. To move a layer to the one position higher in the layer order, click Layer icon ▸ Move layer up.
To move a layer to the one position lower in the layer order, click Layer icon ▸ Move layer down. To move a layer to the bottom of the layer order, click Layer icon ▸ Move layer to bottom.
Adding and removing layers
To create a layer, drag a clip to the middle space between two existing layers or just above the top layer or just below the bottom layer. Once the thin space between the layers is highlighted, release the clip.
To remove a layer, click Layer icon ▸ Delete layer. The Layer icon can be found at the right of the layer name field.
Muting a layer
To mute a layer, click Volume icon. The icon will be toggled to show the layer has been muted. To unmute a layer, click Volume icon again.
What about audio layers?
Unlike in vision, multiple sounds do not “block” each other. If you have multiple audio clips on separate layers, their sound will be mixed together. Controlling the volume of those audio clips simply changes their relative loudness.